
holoVersus (Test Build)
Survival Mode Tutorial
Survival Mode is pretty different from the standard game mechanic wise, so I thought I may as well make a quick primer on it.
By the way, be sure to read the Advance Mechanics article before reading this.
https://zortoise.itch.io/holoversus/devlog/546647/advanced-mechanics
How Survival Mode works:
- Fight mobs across 10 waves.
- Collect the coins they drop when killed (coins also give EX Gauge).
- Buy Cards for power-ups with coins in between rounds.
You can play with a friend via local co-op as well, but the mobs will be a little stronger and both players will have to scrample for dropped coins (coins are not shared) and Cards. When there are two players, if a player loses all their Stocks as long as the other player clear the wave the dead player will be revived with 1 Stock.
There are 4 difficulty levels but Survival Mode currently is not really balanced. I am not sure if the third and fourth difficulty levels can cleared without external tools, so don't take them seriously. Normal difficulty is not too hard to clear if you understand the basics of how the game works, and Hard difficulty can be pretty rough.
Mobs
So, the first thing to know that the enemies you are facing are not actual Guras controlled by CPU. Mob Guras have their own attacks based on the moves of the real Gura.
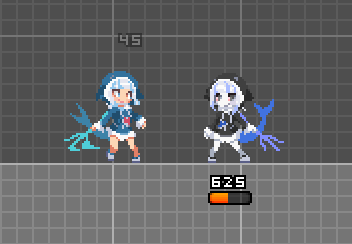
The number below the mob is their remaining HP. The small bar under it is their Guard Gauge. Mob's GG work pretty different from player's GG though.
Mobs do not block attacks. To make up for it, they have a special mechanic called Hit Resistance unique only to mobs. When their GG is not broken, attacks on them will do less damage and cause staggering instead of proper hitstun, but will reduce their GG. Unless you are confident in Guardbreaking them, using non-EX Specials on them is pretty unsafe.
Mobs only enters true hitstun when:
- They run out of GG (Guardbreak).
- They receive a Punish Hit.
- They are hit by an EX Move.
Once they enter hitstun their GG will start rising (speed of rise depends on the "Combo Level", determined by the Attack Level of the attack that send them into hitstun as well as their remaining HP). When their GG rise back to 100%, they will automatically recover from hitstun. They will also recover and regain 100% GG if their hitstun runs out. After recovering from hitstun, mobs gain a special armor that protects them from further hits and grabs for a short while, so you may want to back off.
Due to Hit Resistance and the special armor, the best way to fight mobs is to combo them for as long as you can after sending them into hitstun. Mobs take extra hitstun compared to players, cannot DI or Burst, do not get damage scaling and their knockback is barely increased by their GG, making it easy for you to combo them into oblivion.
Note that some mobs do not have Hit Resistance. The mobs that do nothing but spam projectiles and run away when you get close can be hitstunned off any hit.
When there are multiple mobs, they will tend to come at you one at a time, with the rest hanging out only attacking once in a while. Passive mobs will still attack if you get too close though, and thus they kinda act as stage hazards while waiting their turn. Some mobs ignore this rule and will not hesitate to gang up on you.
Mobs are also different in that their Heavy Attacks have Superarmor. However, they take extra hitstop when Superarmoring through attacks, so you can actually react to their armor and Dodge Cancel your attack to evade the Heavy and land a punish hit. This behavior is mostly there to keep you on your toes.
Cards
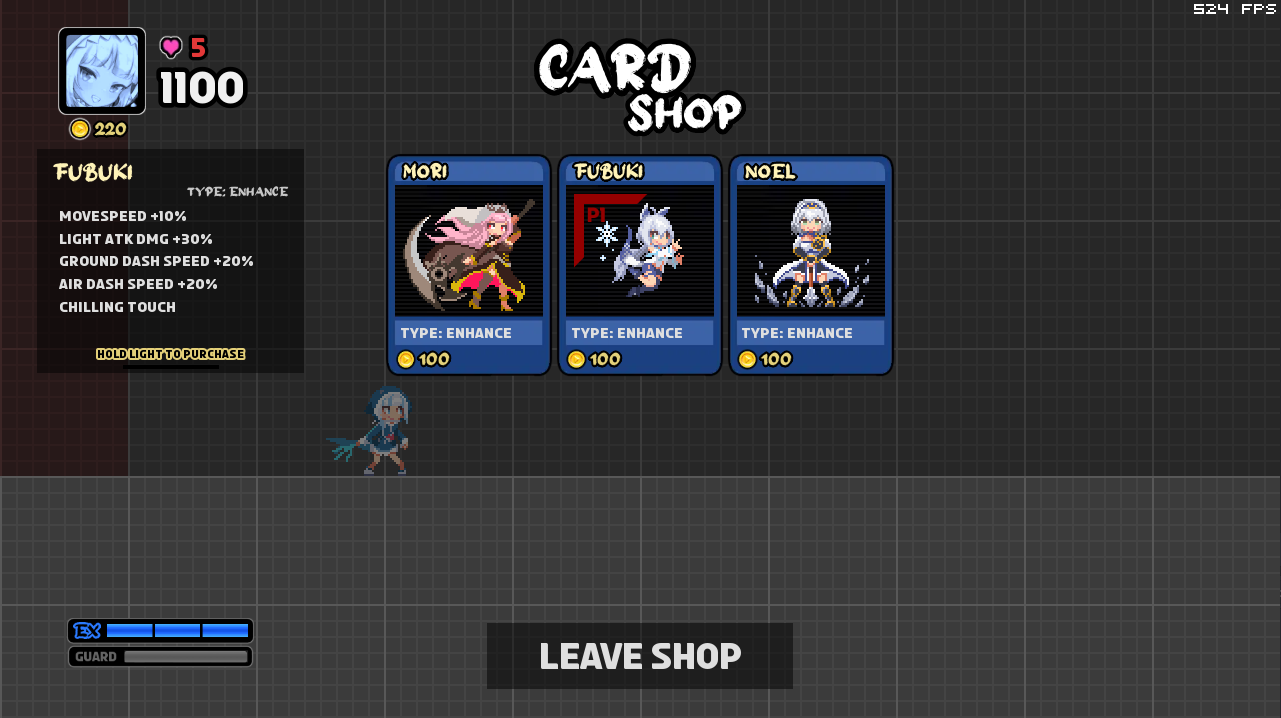
There are kinda like Spirits in Smash Ultimate. Each Card grant you certain power-ups. They are not really balanced yet, and some Cards are much better than other Cards. Many of the Cards also have pretty generic effects that I may revise when more assets are made.
Explanation on some Card effects:
- "___ Touch"
- Allow you to inflict certain status effects whenever you land a physical hit.
- "Combo Level + X"
- Mobs' GG rise slower when you combo them.
- "Passive EX Gain + X"
- Generate EX Gauge over time.
- "EX Gauge Raises Dmg"
- The higher your EX Gauge, the higher the damage of your physical attacks (up to 200% at max EX Gauge).
- "Full EX on Respawn"
- Max out EX Gauge when you die and respawn, also allows you to attack right after respawning.
- "Improved Blocking"
- Mobs deal 50% less Guard Drain when you block their Heavies/Specials.
- "Automatic Tech"
- During Launch Hitstun, will automatically recover from it when hitstun runs out without having to land/tech.
Most Cards with effects that trigger when you do an action are cooldown-based. You can kinda cheese Survival Mode by just running away and waiting for cooldowns, but that will probably take quite a while.
The price of Cards rises as you clear waves. You can also sell your Cards at half the current price. In the future I may use the mascots and fans as "common" rarity cards that are cheaper and give weaker effects for early game. Perhaps I can make different versions of the same Card using different costumes with different effects too. I want Cards that give you Assists too, but that wouldn't be anytime soon.
To exit the Card Shop, just select the Leave Shop button at the bottom. In local co-op both players must select it.
Other Changes
- No passive EX Gauge generation without certain Cards.
- Burst Escape cost 1 bar of EX Gauge instead.
- DI is always active and at full strength.
- Most Armored moves loses their armor.
- You cannot reflect projectiles in Survival Mode (mob projectiles are coded differently from player projectiles for performance reasons, unfortunately).
- Mobs' Heavy Attacks and Special Moves deal extra Guard Drain.
Walkthrough for Early Waves
Wave 1:
- The first mob is kinda dumb and mostly just stand there, but will attack if it gets close enough. You can use it as a guide to see if your combos are good enough. If you can't kill it with 2 combos it's gotta be rough.
- The second mob is a projectile spammer, the first one you will face. Yes, those tridents will home in on you. The easiest way to face opponents like it is to use a forward moving Special with a hitbox that cover your body (Lvl 1 Projectiles can be destroyed by any attacks), like Gura's Harma (surfboard Special, Sp + F in the air). Since Gura's Akontio does not launch horizontally, you can also use Gura's Eudaimon > Eudaimon: Xyston (command dash Stinger, Sp + Dash then Fierce) to approach and attack it quickly.
- The third mob does nothing but jump and aerials. Pretty annoying, swat it out of the air with an anti-air move like Gura's g.uF.
Wave 2:
- The first mob will do nothing but Eudaimon (command dash). You can just rush it down, but the easiest way is to block the incoming Stinger (make sure your GG is full or it will Stun you) and punish. Be sure to DI and Tech properly if you got hit, those Stingers can kill you pretty fast.
- The second mob does nothing but Heavy Attacks and DPs. You can try the same blocking trick as before, but sometimes this mob will attempt to cross you up and a.H you from behind, watch out! Easiest way is to just rush it down and Dodge Cancel if it is armoring through your attacks. You can also use things like dash dances to bait out its DP and whiff punish it.
Wave 3:
- The first part is 2 mobs at the same time. They are pretty basic, and this part is mostly to teach you how to fight multiple mobs. As long as you stay away from the other mob while fighting one they are pretty straightforward.
- Second part is a fight against a basic mob with most of their moveset unlocked and will use a variety of moves against you. There aren't really any real strategy than just playing well, I guess. Just be on the lookout for their armored Heavies.
Tips
- Always collects coins as soon as you can, they vanish after a short while.
- Don't be afraid to spend EX Gauge. You can easily get them back after a kill since coins give EX Gauge as well.
- Ground EX DP is your best friend in this mode. Spam that shit. Do note that Gura's EX DP only have invulnerability if used from the ground.
- Learn some easy to use combos against mobs.
- Learn what the best Cards are. Most of the "Touch" status effects are pretty decent, and Cards that raise damage of Heavies/Specials/Projectiles are always needed. Some Cards are broken as hell.
- Blocking is actually a pretty bad idea most of the time unless against certain type of AIs. Perhaps if you have all the Cards that augment Blocking?
- The final few waves are pretty much complete bullshit, but they are not too bad if you got good Cards. On Normal difficulty you can just hoard enough Stocks and HP to facetank through the final waves, but on Hard difficulty you can't afford to take too many hits.
- Don't get Baelz's Card unless for meme purposes.
Leave a comment
Log in with itch.io to leave a comment.